Kit Of The Month: A Do-It-Yourself Adventure
by Thomas Given
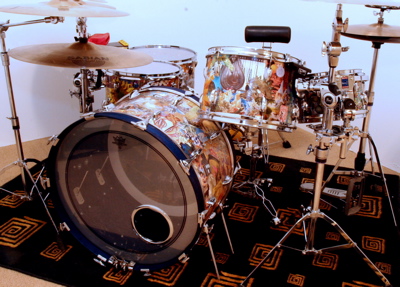
Thomas Given’s Collage Kit appeared in the Kit Of The Month department of the August ’07 MD. Here’s his full report on the creation of this unusual kit, along with a bevy of photos illustrating the project.
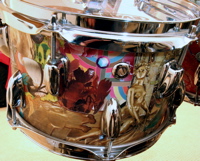
The drums pictured were a previously owned “1970ish” Slingerland kit that I bought for $300 about a year and a half ago. The kit consisted of 10, 12, 13 and 14″ top concert toms (no bottom head!), a 14×24 bass drum, and a nice 6″-deep chrome Tama snare, which I later sold. The tom-toms were mounted and hung over the bass drum on two separate stands, and there was no 16″ floor tom. The kit was covered in shiny metal chrome. This was a 1970s kit so…you guessed it…real metal and real chrome. Honestly, who thinks these things up?
Somewhere in the past there was probably a boardroom that lay at the end of some hall. That hall was more than likely covered in plaques, pictures and paintings of founding fathers of some drum company (not necessarily Slingerland… the concept of concert toms may have originated elsewhere). There, taking part in the evolution of the drumset as we know it today, a manager-type drum dude proposed something original to his group of idea men. “Hey, I know…let’s leave the bottom hoops and skins off of the tom-toms and wrap them in hard steel! That ought to enhance a drum’s sound!” We can now look back at the various forms of percussion being played and displayed in all of those 1970s “glitter bands” and just go “Huhhhh”? Advertisement
The Original Kit
In any event, I was now the semi-proud owner of such a kit. The difference was that these were Slingerland drums. The wood on the interior of the shells was very nice, the hardware was sound and still dependable. After a cursory once-over it looked as though the kit, albeit a little unconventional in its design, was still, at its core, pretty sturdy. Or so I thought.
 When I first decide to restore an older kit, it’s really all about the wood and how together the original hardware is, so I decided this might be a fun challenge. I always love to discover what lies underneath the wrap. In this case, that meant underneath the heavy, powerfully glued-on, chrome steel wrap. It was going to take considerable effort to remove that wrap before I’d be able to actually view what type of wood awaited me underneath. Oh my achin’ back.
The interiors of four of the drums had reinforcement rings on the resonant and batter sides. Apparently the drums were originally intended for heads and rims to be placed on the tops and bottoms of the shells, but instead were re-designated to be sold as concert toms. The 10″ tom did not have the reinforcement hoops. Advertisement
 Upon close inspection where these hoops were joined to the interior of the shells, I discovered small “bubbles”… areas of about 1”4″ to 1”8″ that ran the entire circumference of the shells. The first layer of the interior ply had started to separate from the drum, ever so slightly, lifting it away from the edge of the hoops. I guessed it was more likely a manufacturing error than the water damage it resembled, since it was the same story on almost all of the shells. I knew that it was going to be above and beyond the call of duty to restore this gang of tubs.
Finding A Floor Tom
 Before starting the restoration of this kit, I started to seek out a perfectly matched floor tom from the same era to add to the rest of this kit. It turned out to be quite an adventure.
I went to eBay for a 16″ Slingerland floor tom. There were many to choose from, and I selected a white oyster wrap drum that appeared to have the correct Slingerland lugs and tension rods (judging from the photograph). After bidding for it over the next few days I ultimately won the bid. I then paid up, excitedly anticipating the package.
Beginning The Restoration
While I was waiting for my floor tom–to–be, I began the process of restoring and beautifying the other drumshells.
 I stripped the shells of all of the hardware, placing the removed rods and mounts, along with the lugs, screws, and washers, into separate aluminum tins. I soaked them in Varsol, a grease-dissolving, chrome-friendly solvent. (Note: Credit must be given to Jeff “Korky” Korkola, former drum manager at Steve’s Music in Toronto and the cool dude who turned me on to Varsol when I worked for him and was restoring another drumset in the mid-’90s. Yo, Korky!)
Advertisement
I stripped the shells of all of the hardware, placing the removed rods and mounts, along with the lugs, screws, and washers, into separate aluminum tins. I soaked them in Varsol, a grease-dissolving, chrome-friendly solvent. (Note: Credit must be given to Jeff “Korky” Korkola, former drum manager at Steve’s Music in Toronto and the cool dude who turned me on to Varsol when I worked for him and was restoring another drumset in the mid-’90s. Yo, Korky!)
Advertisement
 Now the fun really began. I strapped the bass drum to my workbench with a piece of rope. Using vice-grip pliers to grab the edge of the wrap, I donned a mask to protect me from the vapors of melting adhesive and aimed a powerful paint-stripping heat gun at the steel wrap. Sweeping right and left across the shell, I ever-so-gently pulled to remove it. When a good length of the wrap was hanging like some oversized silver noodle, I used tin snips to cut the piece off. Then I turned the drum and started the whole process all over again. Five shells in all, one by one, heat gun–stripped to a gooey finish, with the melted glue of percussive yesteryear swirling on the grain. Yecch!
 But what was this? The kit I was originally going to sand, stain, and lacquer was sporting two different finishes on the outer plies! The 10″ was again the lone holdout, with a beautiful finished-maple outside ply. The other three toms and the bass drum had exterior plies of rough mahogany. To make matters worse, a small area of the mahogany on one tom had actually splintered off due to a few moments of hasty carelessness when the steel wrap was removed. (I’m an impatient idiot sometimes, let’s just admit that right now.) Staining was now out of the question, but I continued to repair, thinking about what to do with these mismatched and now slightly damaged shells
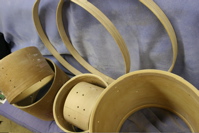
It also became apparent that some of the holes previously drilled into the drums–including the bass drum’s unnecessary but nonetheless present tom-tom mount hole–would have to be filled. And new holes would need to be drilled in order to place a bottom head on each tom shell. Filling the holes would be accomplished with pieces of dowel of various diameters. Advertisement
 Screw holes on older drums are not all equal. A rat-tail file helped me hone the specific holes to the proper size. I cut small pieces of the dowels, just slightly longer than the shells were thick. I applied white glue and made sure each piece was a tight fit when I pushed it through. After the glue had dried, I sanded the dowel stubs down to the edge of the drum. It was obvious that, whatever I decided to do to the drum’s exterior, these dowel plugs were going to plainly show from both sides. So no matter how dark a stain I might choose, it would not be able to hide the blemishes on the wood. What should I do to restore these problematic drums?
The Answer Came At The Bookstore
 I read a lot. So I’m frequently in line at a local bookstore. In the checkout area is a shelf with “coffee table books” full of pictures and information on subjects such as planets, movie stars, ocean creatures, and art studies, alongside exposés on various countries and cities around the world. I scanned the shelf looking for inspiration. My eyes wandered to the “art” section. It was then that an epiphany occurred.
There were about nine books in all, each on sale at between $5 and $9. The titles announced the content of each: Art Nouveu and Macintosh stained glass, art deco pieces, East Indian art, Asian art, even a book of art concerning angels and fairies. Inside were pictures of beautiful jewelry, paintings, fabrics, religious icons, animals, pottery, and other art objects from the time of Caesar to the present. I knew then that mahogany or maple drumshell exteriors no longer mattered. Advertisement
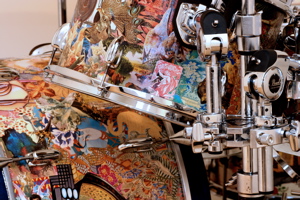
 I am known as a creative person. I dabble in writing, photography, paint, clay, comedy performance, music collecting, and drums. I’ve done collages many times. Why not collage a drum set? The filled holes would then only be visible from the interior, which by now I had decided to paint in dark blue acrylic.
I used paint stripper on the outsides of the shells to carefully remove all the old glue. I didn’t use the stripper on the interior, because the interior sealant or coating usually sands off easily, requiring less use of the powerful paint remover. I sanded the interior and exterior of each drum to a 220 grade.
 I had a local woodworker drill holes for bottom hoops. We had to stagger the 10″ tom due to the depth of the top lug holes. I had seen staggered-lug toms before, and I later discovered that I actually liked the 10″ shell looking like that. It gave it a kind of personality, ya know?
Advertisement
I had a local woodworker drill holes for bottom hoops. We had to stagger the 10″ tom due to the depth of the top lug holes. I had seen staggered-lug toms before, and I later discovered that I actually liked the 10″ shell looking like that. It gave it a kind of personality, ya know?
Advertisement
Meanwhile, Back At The Floor Tom…
During all of this restoration process, I was wondering what shape my eBay-purchased 16″ floor tom would be in. When I ultimately received the box in the mail, I got all excited. As I pulled the floor tom out of the box, everything seemed okay. The lugs were correct. The wrap on the drum was white oyster, faded nicely to the familiar yellow. The drum just seemed…well…sort of light. The “uh-oh” bells started to go off in my head. I sincerely dislike those bells.
 Looking down into the drum, I noticed that the wood was not quite the finished quality I expected from a Slingerland drumshell, and that it was very different from the others. It was then that I saw something else I certainly didn’t expect. Three reinforcing hoops: top, bottom, and…center? One of the tiny 1”2″ hoops’ glue was failing, and it was actually rising off of the wood. I don’t remember Slingerland–or anyone, for that matter–ever having three inside hoops. Except, perhaps…a Japanese kit. The “uh-oh” bells were now clanging in my ears.
 I removed the hardware. The chrome pieces were a perfect match to the lugs I had already removed from the other shells, so they were definitely Slingerland. There was felt stuffing in the springs–again, the same as the others that I had. I was relieved to discover that the hardware was very sound, not pitted or rusty, and considered this another good sign. I then removed the white oyster cover. It fell away easily, since a piece of double-sided tape was the only adhesive used. There, in a faded green ink, was a diamond-shaped logo. It was definitely not Slingerland. It said…Chukyo.
Advertisement
I removed the hardware. The chrome pieces were a perfect match to the lugs I had already removed from the other shells, so they were definitely Slingerland. There was felt stuffing in the springs–again, the same as the others that I had. I was relieved to discover that the hardware was very sound, not pitted or rusty, and considered this another good sign. I then removed the white oyster cover. It fell away easily, since a piece of double-sided tape was the only adhesive used. There, in a faded green ink, was a diamond-shaped logo. It was definitely not Slingerland. It said…Chukyo.
Advertisement
After Googling “Chukyo +drum shells,” all I got was information about Chukyo, a city in Japan. Apparently, the city was no longer a lively center for the construction of drumshells for future drummers influenced by the 1960s British Invasion boom (like yours truly).
To be fair, the man who sold me the drum could have easily thought that it was a genuine Slingerland drum, considering the lugs and the wrap that were present. (After all, I did.) He was nice enough to adjust the credit card payment and only keep a little for the lugs, which I asked to retain. Then it was on to eBay again to search. After securing “floor tom #2” for shipment, I began work on the other five shells.
Back To The Workbench
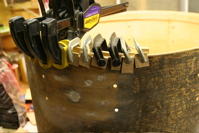
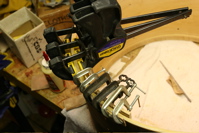
 The first thing to do was to repair the aforementioned “bubbles.” For this, I purchased a chair glue kit. Chair glue is a very thin, runny, type of glue. These kits come with glue-applying hypodermic needles. The needles come in three sizes in order to easily regulate the level of “actual glue squirt” (AGS) being injected. I put on my magnifier glasses, and, using an Exacto knife, raised the bubble slightly, injecting the glue carefully underneath. I placed a small wood shim (wrapped in wax paper so the leaking glue would not stick to it) on the interior side, and clamped the bubbles firmly down. I only have so many clamps, so I could only do about 6″ to 12″ of shell at a time. I then immediately had to clean out the glue needle with soap and warm water, and let everything dry prior to the next application hours later.
Advertisement
The first thing to do was to repair the aforementioned “bubbles.” For this, I purchased a chair glue kit. Chair glue is a very thin, runny, type of glue. These kits come with glue-applying hypodermic needles. The needles come in three sizes in order to easily regulate the level of “actual glue squirt” (AGS) being injected. I put on my magnifier glasses, and, using an Exacto knife, raised the bubble slightly, injecting the glue carefully underneath. I placed a small wood shim (wrapped in wax paper so the leaking glue would not stick to it) on the interior side, and clamped the bubbles firmly down. I only have so many clamps, so I could only do about 6″ to 12″ of shell at a time. I then immediately had to clean out the glue needle with soap and warm water, and let everything dry prior to the next application hours later.
Advertisement
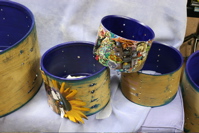
 After all the gluing and glue removal was done, I wanted next to attend to the interiors before doing the exterior. Since the interiors were a little bruised from the various restoration processes, I decided to complement the collaged exterior I was envisioning with a midnight blue interior.
After applying two shades of ultramarine to the interiors, I gave them all a fast blast of clear lacquer (for the acrylic paint’s protection, and to make them a little shiny). It looked like a midnight sky. After the lacquer had dried, I taped newspaper on the inside to protect it from the work on the exterior.
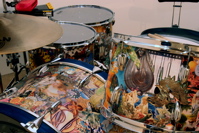
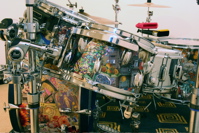
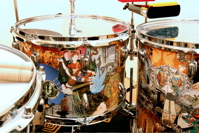
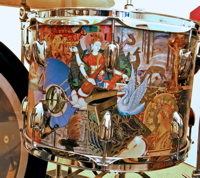
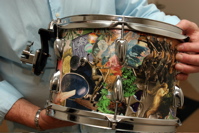
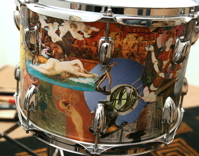
Creating The Collage
 A trip to the art store provided me with a tough clear gloss gel, as well as a high quality 1 1”2″ brush to apply the gloss with.
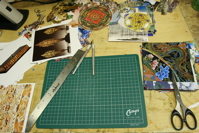
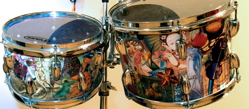
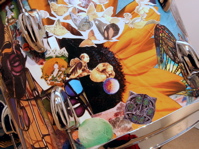
I cut close to a thousand images out of my art books. Some were of little jewels or sea horses smaller than half of a dime. When one is using the medium of collage, it’s difficult to decide where all of the pieces will go. Which will take prominence, and which should go behind or be left out entirely? I cut and cut through these books, placing the cut items in various piles, the similarity of which was judged according to size and content (i.e. so I could find them easily later). Advertisement
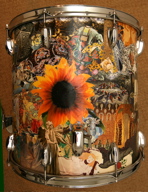
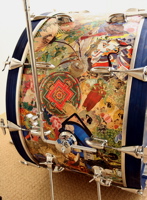
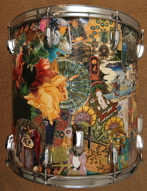
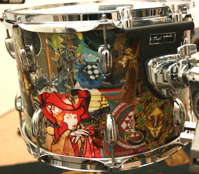
The 10″ was the first drum to be done, and was somewhat of an experiment at this point. After finishing this first shell and being satisfied with the results, I moved forward to do the others. I had two rules. First, every piece must be different; I could not put things on one drum and the same on another. To be truthful, there were a few repeated things, like 1”4″-size seashells and the like. (Too nice to waste, and you would be hard pressed to find them.) So to be accurate, each drum’s content is 99.9% different from any of the others, making each shell unique.
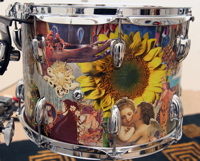 The second rule I had was to have a sunflower on each drum. I had acquired pictures of big, colorful sunflowers from a calendar. They were larger than the pictures I had cut from the books. I love these flowers (who doesn’t?) and wanted to use more than one of the pictures. So it was decided. Each shell would have a sunflower (or two, in the case of the bass drum and floor tom, since they were larger than the other four shells).
Floor Tom #2…And Friend
 In the midst of all of this, floor tom #2 arrived, with its shell enveloped in a beautiful golden stain. All of the hardware was sound. Then there came the question of the bubbles. Might they be absent on this drum? No such luck, dude. Get out the glue, choose a needle size, and begin the squirtfest. The job proved necessary but somewhat tolerable, since the repairs on the other drums were, by now, long ago finished. Just one last bubble repair to go, hold the relish.
Advertisement
In the midst of all of this, floor tom #2 arrived, with its shell enveloped in a beautiful golden stain. All of the hardware was sound. Then there came the question of the bubbles. Might they be absent on this drum? No such luck, dude. Get out the glue, choose a needle size, and begin the squirtfest. The job proved necessary but somewhat tolerable, since the repairs on the other drums were, by now, long ago finished. Just one last bubble repair to go, hold the relish.
Advertisement
At this point I might also mention that sometime during this year of drum collaging I was fortunate enough to happen upon a 6 1”2″x14 chrome Slingerland snare that was hefty in weight and mighty in sound. I thought it would be a really nice snare to round out the kit, so I made the purchase.
Finishing Touches
 It took about a year to get the kit to where I could put it together and play it. I toothbrushed the threads of the original tension rods and used extra-fine steel wool to polish up the chrome. I cut new pieces of felt and placed them between the springs and the housings. I placed lug grease in every lug before turning the tension rods. I used newly purchased shiny chrome screws and washers in place of the originals. I ordered the new hoops and all of the skins. For fun I placed an “L” shaped bass drum cymbal mount on the side of the bass for my ride cymbal. (I’d had one of those on my first drumset–a Japanese-made St. George that was in the living room on Christmas morning in 1965. After that I knew I was in the ranks with Ringo, and nothing else would ever matter.)
 After all of the pitfalls, the Slingerland Collage kit is obviously pretty special to me. And it really sounds great! Would I do it again? You bet. In fact, I have plans to do another drum project this fall using a different book of photographs. I’ll keep the theme to myself. Perhaps you may see it here next year, if MD will have me.
Advertisement
After all of the pitfalls, the Slingerland Collage kit is obviously pretty special to me. And it really sounds great! Would I do it again? You bet. In fact, I have plans to do another drum project this fall using a different book of photographs. I’ll keep the theme to myself. Perhaps you may see it here next year, if MD will have me.
Advertisement
Thomas Given
ThomasGiven@hotmail.com
