Modern Drummer Education Team Weighs In On: Developing Independence
We asked the members of the Modern Drummer Education Team to share their thoughts on their favorite methods for developing independence. Here’s what they had to say.
David Stanoch
I think the terms “independence” and “coordination” are often confused as being interchangeable among drummers, so let’s focus on that for a moment. It certainly takes coordination to develop independence, but coordination can be defined as “the organization of the different elements of a complex body or activity so as to enable them to work together effectively.” That can certainly lead to independence in drumming, but it is not limited to that idea alone.

Now let’s consider some definitions of independence that best apply to drummers and drumming: “not connected with another or with each other; separate,” and “not depending on something else for strength or effectiveness; freestanding.” Being drummers, we sometimes might like to employ two hands in a manner separate and freestanding of our feet, so that the hands might improvise while the feet play a repetitive pattern. That is coordinated independence.
In the following example, the four limbs are notated with the right hand above the top line and the left hand underneath; the right foot is notated above the bottom line, and the left foot is below. Consider the notes to be neutral, so you could voice your limbs anywhere you want on the drumset. Advertisement

In that example, the hands and feet here move identically to each other. This is an example of what I call “dependent coordination.” It reflects a fundamental element of how our brains are naturally wired for balance. The right and left limbs play in unison in an alternating sequence. It is a coordination exercise anyone, drummers and non-drummers alike, could execute easily.
In the next example, the hands stay the same as before, but now the feet flow opposite the hands. This is a basic example of “independent coordination.”

That deceptively simple-looking example can stop even an experienced drummer dead in his/her tracks. Coordination-wise, it is much more difficult to execute.
These examples come from my book, Mastering the Tables of Time, Vol. 1, and are simplified versions of studies I first encountered in the book 4-Way Coordination, by Marvin Dahlgren and Elliot Fine.
Though I studied dependent and independent coordination interchangeably in 4-Way Coordination, I assumed it was all regarded as “independence.” It wasn’t until I was introduced to what Bob Moses calls “the non-independent method” in his book, Drum Wisdom, that I clearly understood the distinction between the two types of coordination. I came to realize that independence was particularly useful for creating layered examples of “harmonic” coordination. What follows are some patterns from Mastering the Tables of Time, Vol. 1 that exemplify this.
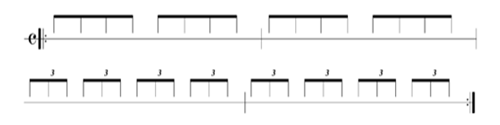
Bass Drum Development Over an 8th-Note Hi-Hat/Snare Backbeat

Practice this with a metronome set to a tempo where you can easily execute the 16th-notes triplets in the bass drum (letter H). Keep the 16th-note-triplet subdivision running in your head to properly execute the polyrhythmic 8th-note, quarter-note, and half-note-triplet subdivisions at letters B, D, and F. Practice each bar separately, and then work on moving through the entire timetable, focusing on anticipating the next bar so you can stay locked with the click. Play with feeling and expression. Advertisement
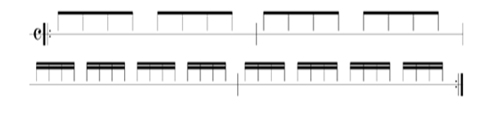
Jazz Comping With a Cymbal/Hi-Hat Ostinato

Practice this with a metronome set to a tempo where you can easily execute the 16th-note snare/bass drum combination at letter H. Practice each bar separately, and then work on moving through the entire timetable.
What the changing voices in these examples offer is “interdependent” on the other limbs to provide balance and a good feel, but it is the independence in the voices that offers drummers the freedom to express themselves around the ostinato without limitation. Some other drummers that come to mind who excel at this type of independent coordination are Walfredo Reyes Sr., Terry Bozzio, and Thomas Lang.
Dependent coordination is an amazing tool for creating a more melodic, forward-moving, and non-repetitive rhythmic continuum because it is based on one rhythm, usually led by one limb/voice on the kit, which is supported by combinations of the other three limbs. What folows are some patterns from Mastering the Tables of Time, Vol. 1 that exemplify this. Advertisement
Modulating Double Paradiddle Beat

Practice with a metronome set to a tempo where you can easily execute the 16th-note combination at letter D. Practice each bar separately then work on moving through the entire timetable. Focus primarily on the cymbal rhythm and how the bass drum works in unison with it to create the dependent coordination. The snare accents add balance and color.
Polyrhythmic 3-in-4 Shuffle

Practice with a metronome set to a tempo where you can easily execute the 16th-note combination at letter F. Also note that there’s the option of added independence by playing the hi-hat on beats 2 and 4 throughout. This can help you lock in all of the variations, but be sure to try the combination without the hi-hat to experience the freedom of the dependent coordination as well.
Some drummers who come to mind as great practitioners of dependent coordination are Jack DeJohnette, David Garibaldi, and Steve Gadd.
(All examples are excerpted from Mastering the Tables of Time, Volume I, published by Alfred Music Publishing. Used with permission.)
Chuck Silverman

Within the realm of Brazilian and Cuban rhythms can be found many beginning, intermediate, and advanced coordinated independence exercises. Over the years, I have developed many of these grooves into patterns for developing command and control of the drumset. I have also spun off from the main grooves and developed many applications that have groove as the root. This last item is most important, as you can trace back from the more creative approaches to the basic root rhythm and groove. Advertisement
Samba
Here are two important Brazilian grooves for samba. A drummer conversant with this music would not stay with one phrase, but vary the rhythms—all with groove in mind.

This is almost exactly the same groove as above, but with the measures reversed. Most Brazilian jazz features this type of rhythm.

The Baião
Here are two grooves for baião. (The different bass drum patterns for baião can also be accompanied by a backbeat on the snare.)

Songo
Here are two grooves that I learned from Jose Luis “Changuito” Quintana. Both require an advanced level of coordination and are extremely musical.

Marko Djordevic
When it comes to independence and coordination, I often employ a “throw my students into the deep end of the pool” approach. I do this by challenging them with some material that is quite advanced. It is really fun and rewarding to see the progress between my first demonstration, when they usually laugh and make “I give up” gestures, and a few weeks down the road, when they demonstrate audible and visible progress after working hard to conquer difficult issues inherent in the materials.
 Over the years, I have developed many “polymetric” melodic ideas on the drumset that consist of playing three or four different time signatures simultaneously. For example, a piece of music I created entitled “What Time It Is” consists of a five-note melody with the right hand, a bossa ostinato on the bass drum, a three-note splash-step-step left foot hi-hat pattern, and a seven-note rhythm on the snare (quarter, quarter, quarter, 8th). Entrances are one at a time. Once all the pieces are in place, I improvise with the left hand, first in 7/8 and then in the time signatures played by the other limbs. “What Time It Is” was not written as an exercise but a piece of music, so despite the challenging nature of the material, the ultimate outcome is something that sounds good above all else.
There are many more pieces that I have come up with that employ this concept. “LIDC Idea” has the bass drum and left hand playing in 3/8, while the right hand is in 2/4 and the left foot is in 5/8. Once established, the left foot solos. “Polyrhythm Class” is a piece revolving around a ride cymbal rhythm in 5/16 (which sounds almost like swing because I play 1, 3, and 5 on the ride), a bass drum in 7/16 mimicking a pattern played by the traditional Balkan gotch or tapan drum (8th, 16th, 8th, 8th), and a 3/16 pattern played between the left foot on the hi-hat and the left hand on the snare (two hits with the left hand plus one left-foot stroke). Again, for the math involved in those pieces, they actually sound really good once they are played right. Advertisement
The effort that it takes to get those advanced pieces together naturally improves upon many aspects of more common drumming (musicality, time, precision, subdivision awareness, posture, balance, and technique). If anything is amiss, the pieces won’t sound good, so the student’s improvement in all of these areas is “forced” by the difficult music they are expected to perform.
Another very important component in mastering the coordination and independence of these pieces is vocalization. Singing one part while playing another will always bring you closer to being able to play them both simultaneously.
When it comes to developing independence along with rhythmic awareness, I often suggest playing upbeat 16th notes on the hi-hat with your foot when playing regular drumset rhythms. This will help with your balance on the instrument. When both feet are active, and especially if one is engaged in a difficult rhythm like constant 16th note upbeats, your body tends to feel disoriented. The ideal is to not reveal that anything is out of the ordinary. Try to keep your torso and upper legs as still and relaxed as possible, regardless of how difficult the material you are playing. I’m not saying that you have to perform looking like your body is a giant poker face, but it’s a great sign of control if you can do this in your practice. Advertisement
One of the most interesting steps in my book The New Frontier is the point at which all four limbs are engaged in constant improvisation. This concept isn’t new; it has been a staple of interactive drumming for decades. What is new in my approach is that I’m using the left foot on the hi-hat as a separate voice capable of interacting with other limbs in ways that I have not heard done before. For a simple example, think of the hands playing RLRR LRLL while the feet are playing RRLR LLRL. Now think of the feet being able to play all sorts of similar combinations, including figures like LLRLR or RLRRLL, while the hands are doing something else. And now forget about patterns, and imagine stream-of-consciousness flows upstairs and downstairs, with the only obligation being to the music itself. Of course, this approach doesn’t work in all styles, but when the music calls for surprising textures and adventurous drumming, the effect of this free-flowing approach can be great.
One thing I’ve been doing to get my left foot up to snuff is playing Afro-Cuban patterns with the cascara rhythm played by the left foot instead of the right hand. Also, I came up with a hi-hat and bass drum combo, hhhb hhbh bhhb hhhb (h=left foot on hi-hat, b=bass drum), while playing different inversions of singles and doubles between a rim click and the ride.
Finally, back when I was fifteen and first taking interest in the tremendous book 4-Way Coordination, I came up with the following flow:
RBLH BLHR LHRB HRBL HLBR LBRH BRHL RHLB
(Legend: B = bass drum, H = hi hat with foot, L = left hand on snare, R = right hand on floor tom)
When I first came up with that and got it going (quite slowly), I focused on the sounds and the flow, trying to visualize each limb as it played. I practiced it quite gingerly at first, becoming more surefooted as time went on. When I stopped, it seemed like I had been practicing for about fifteen minutes. But when I checked the time, I realized that about two hours had gone by. Advertisement
Jeremy Hummel
Click here to view the Coordination Building article pdf from Jeremy Hummel.
Bill Bachman
https://www.youtube.com/watch?v=lD_UNpZRUDs
Jason Gianni
One of the most important things that I stress in drum lessons is that independence is based on the fact that all of your limbs should be in an equal state of performance. In other words, each individual component of a pattern should be able to be played alone with as much conviction as when you put everything together. When working on a pattern that requires extensive coordination, a good test is to withdraw one limb at a time to see if the skeleton of the pattern remains intact.

That said, there are many angles from which a drummer can approach independence and coordination. I feel that a strong sense of independence is based around the understanding of how to control and develop ostinato patterns. However, as a result of the multitude of ostinatos and styles a drummer can explore (jazz, rock, Latin, soloing, etc.), it is important to hone in on the categories you would want to explore. I may ask a student ahead of time if he/she would like to explore groove-oriented coordination, style-oriented coordination, or even soloistic coordination. Once that’s settled, it becomes much easier to determine how to apply different exercises.
For more on my approach to developing independence, check out the three-part series I wrote for Modern Drummer on ostinato soloing (Sept. 2011, Nov. 2011, and Jan. 2012). Video links that accompany those articles are below. Advertisement
Ostinato Studies, Part 1: The Building Blocks
Ostinato Studies, Part 2: Cross-Rhythms
Ostinato Studies, Part 3: Metric Modulation
Claus Hessler
My concept of drumming is about being in control of rhythms, sounds, and dynamics, and usually in the context of time and pulse. There are two aspects of that control that constantly spit in our soup: technique and independence.
 There are tons of exercises and concepts that you can follow to improve and fine-tune your independence skills, beginning with the father of modern drumset independence Jim Chapin’s legendary book, Advanced Techniques for the Modern Drummer, which is a milestone in the subject that every drummer should have in his/her library.
To gain deeper understanding about the challenges that independence has in store, you should be aware of two things. First, adding dynamics into the process of practicing independent patterns between the hands and feet will raise the level of difficulty drastically. This short excerpt from my book Daily Drumset Workout will give you an idea on how to practice that. Advertisement
Keep the 8th notes on the hi-hat going, including the accent on the quarter notes and add exercises A to D to that. Your bass drum still is not in the game: It could be just 1 and 3, or whatever your choice is. And of course you can pick a variety of different hi-hat patterns.
Second, we are usually not aware of the fact that we connect certain sounds with certain movements on an intuitive basis. The problem is sometimes we are not able to disconnect these two when we wish to, which may result in limitations regarding musical expression. For example, usually we are so much used to only having the hi-hat played by our right hand and snare with our left that changes in this strategy might make us play 8th notes on the snare and the 2 and 4 on the hi-hat.

Here’s another example from Daily Drumset Workout and my DVD, Drumming Kairos. To begin, pick any of the following hi-hat patterns and play it with your right or left hand.

Keep the hi-hat pattern going, and play the rhythmic line below, using different interpretations (on the snare, on the kick, as snare/kick unisons, alternating between the snare and kick, etc.). Make sure the accent pattern on the hi-hat remains unchanged. Advertisement
![]()
Independence practice should be considered necessary to help realizing your musical vision. Enjoy the journey!
Jim Payne
Rather than tell my whole life story, a lot of which is about how to develop drumset coordination, I’ll give three ideas.
 When I first started, I listened to records and copied what the drummers were doing on those records. Then I started writing downbeats and analyzing the types of coordination that were being used. In my first book, Funk Drumming, I laid out what I considered the elements of funk coordination, the combinations of limbs needed to create funk beats. These combinations were presented in lengths of two quarter notes, starting with 8ths on the hi-hat with backbeats and adding many possible bass drum patterns. Then I added the ghost notes between the backbeats while keeping 8ths on the hi-hat. The same snare and bass drum patterns were then reworked with different hi-hat patterns.
This worked pretty well and still works well, until I discovered 4-Way Coordination by Elliot Fine and Marv Dahlgren. I had the pleasure of meeting Elliot and Marv, who came to my NY loft shortly after Funk Drumming came out. I witnessed them actually playing through 4-Way Coordination at the marked tempos, which were very fast, and immediately realized that this was the future of drumset coordination.
Yes, that book is super-hard, but it’s also super-effective. It’s based on the principle that each limb gets equal attention. If you work through 4-Way Coordination, I guarantee your feet will get stronger. When it gets to putting everything together, there are many possibilities. I start with the 8th note at 64 BPM and progress up to 94 BPM. You’ll get lots of results with those tempos. Advertisement
Confronted with the super-complex and super-funky grooves of David Garibaldi and Mike Clark, I have recently taken another approach to drumset coordination. In his book The Funky Beat, Garibaldi uses a different concept. First, come up with a hand pattern that you like, whether it’s Latin cascara, King Kong–type rhythms, paradiddles, or rhythms using ghost notes. Get that down so that you can play it in your sleep. Then add some bass drum patterns, beginning with 8ths and then then throw in some 16ths. All the while, make sure the hand pattern is groovin’ along. I found that this approach not only makes musical sense (i.e. the grooves are funky and have a good feel), but it made the complex style of Garibaldi and Mike Clark much easier to execute.
Marc Dicciani
There’s no magic or secret to improving your skills and becoming a better drummer. It just takes a lot of smart practice (practicing the right things, the right way). There’s one thing that I practice regularly, in many different ways, that has had a significant effect on improving the technique, control, independence, and coordination for me and for my students: stickings!

The ability to play a rhythm using many different stickings is important, as it allows you to play almost any phrase using any combination of sounds and limbs, which greatly extends your creativity and musical vocabulary. Command of basic sticking patterns, practiced as outlined below, will increase your hand-to-hand and hand-to-foot coordination, as well as your control in playing grooves, fills, and solos. Advertisement
Here are seven basic stickings of four strokes where no more than two strokes are played consecutively with the same hand. These can be reversed and combined to create thousands of variations. At first, play the upper note head with the right hand and lower with the left. Practice slowly, with no accents, stressing smooth and even rhythm.
![]()

Once you feel comfortable with those basic patterns, add two more measures, playing the same stickings at double the rate (16th notes).
Now we’re going to take it one step further, and add two measures of 8th-note triplets using the same stickings. Once you start to play some of these variations on the kit, you’ll see how useful they are in creating very interesting rhythmic patterns, especially since they cross the bar line. At this point, I begin to add accents to various notes.
You can keep adding different rhythms, or add two measures of 16ths after the triplets. And when you really start to develop facility, you can add a couple measures of 16-note triplets.
There are no R’s or L’s in the sticking patterns. That’s because you can assign the notes above and below the line to any limb or sound, and not just the right or left hand. Here are a few possibilities. Advertisement
1. Upper note: RH, lower note: LH
2. Upper note: LH, lower note: RH
3. Upper note: RH, lower note: RF
4. Upper note: LH, lower note: LF
5. Upper note: RH, lower note: LF
6. Upper note: LH, lower note: RF
7. Upper note: RF, lower note: LF
8. Upper note: alternating, lower note: RF or LF
9. Upper note: RH or LH, lower note: alternating feet
10. Upper note: alternating hands, lower note: alternating feet
When you’ve work through all of that, start to build some compound sticking variations by combining the basic patterns (1 and 2, 4 and 6, etc.).
A critically important step is to take these stickings to the drumset and come up with musical and creative ways to play them on the kit in different styles and tempos. Here are just two of the many thousands you can create.
Sticking #1
Upper note: RH
Lower note: RF
Play continuous 16th notes between the RH on the floor tom and the foot on the bass drum while improvising around the kit with the left hand.
Sticking #2
Upper note: LH
Lower note: alternating feet
Play 8th-note triplets between the LH on the snare and the feet while playing jazz time on the ride cymbal with the RH.
Steve Fidyk
 In my practice, I integrate standard methods, like Jim Chapin’s Advanced Techniques and Gary Chester’s New Breed. I also use George Lawrence Stone’s Stick Control and Ted Reed’s Syncopation and interpret the written material around the kit as a vehicle for developing coordination. For work in 3/4 and 5/4, I use my own book, Jazz Drumset Independence (Mel Bay).
Working on your independence in the practice room will give you the freedom to play ideas that you hear in the heat of the moment while on the bandstand. The drums are a rhythmic instrument, and the musicians we play with expect us to inspire and challenge them. But the transition from the practice room to the stage might take a considerable amount of time. Be patient with yourself, and make sure you really own it before using these rhythmic patterns with others. Can you play them first thing in the morning? How about in the middle of your most stressful day? Or can you play them late at night when you’re exhausted and haven’t had dinner? If so, then the ideas are ready for the stage. Advertisement
Jeff Salem
I always remember one of my early drum lessons, when my teacher asked me to apply quarter notes on my bass drum to a simple quarter-note/8th-note snare exercise. I will never forget how much of a challenge it was to avoid flamming my hands with the bass drum, especially when the bass note had to play in unison with my left hand.

One coordination exercise I give to all my students is what I call the Big 4 foot patterns. They aren’t too difficult but will have plenty of application at all levels and styles of playing. Try playing them under a variety of hand patterns.
The Big 4
Pattern 1: quarter notes on the bass drum
Pattern 2: quarter notes on the hi-hat (with the foot)
Pattern 3: Half notes on the bass drum and the hi-hat (with the foot) on beats 2 and 4
Pattern 4: Quarter notes on the bass drum with the hi-hat (with the foot foot) on beats 2 and 4
Once students are comfortable playing the Big 4 underneath simple marching-type snare drum exercises, I will move into drumkit applications. Pattern 2 is great to apply to any rock beat playing off the ride cymbal. Pattern 3 is a great one to introduce students to a two-beat jazz feel. Pattern 4 is great to demonstrate a 4/4 jazz feel. Advertisement
It’s important to help students develop a nice balance between all limbs. I will give them a pattern or rhythm to play on the bass drum, and then move it to the hi-hat (foot), and then to the ride cymbal and snare. The video below demonstrates a 3-2 rumba clave played in this context.
I also try to get students to learn songs open-handed. I will have them first play it traditionally, with the hands crossed over, and then switch at the second verse to open-handed playing, while listening to see if the groove or dynamic alters. This is a great coordination exercise.
Some more advanced approaches I use with students involve reading of page 38 of Ted Reed’s book Syncopation. (It was page 37 in the original printing.) Alan Dawson wrote a book titled, The Drummer’s Complete Vocabulary, which shows many ways to practice this page to develop plenty of independence and coordination. I also like using Modern Text Reading by Louie Bellson. Have fun, and be patient. The world of independence is a life long journey, so enjoy the ride. Advertisement
Mike Sorrentino

I have a few methods that work really well for my students, as well as for me. (I still practice some of this stuff.) From a method book standpoint, I pretty much stick with a standard group, including Chapin’s book, Gary Chester’s New Breed, and I love Gary Chaffee’s books, especially Time Functioning and Linear Playing. That book contains some of the most immediately useful and musical exercises. The other two books that I use the most are Syncopation and Stick Control. I believe all of the exercises I teach from those texts have been handed down from Alan Dawson, or at least they began with his methods in mind and were twisted along the way.
A shortcut to independence that I discovered along the way was to play a figure in three over a steady ostinato. The ostinato can be pretty much anything. I’ve found that once a student can play this figure with different ostinatos, they will master most of the other things we’re working on quite quickly.
Donny Gruendler
 Over the years, I have accumulated and devised a vast array of coordination methods that apply to specific musical applications. My favorite four approaches are backbeat-based timekeeping, jazz timekeeping, Latin timekeeping, and backbeat-based fills.
Advertisement
Over the years, I have accumulated and devised a vast array of coordination methods that apply to specific musical applications. My favorite four approaches are backbeat-based timekeeping, jazz timekeeping, Latin timekeeping, and backbeat-based fills.
Advertisement
Backbeat-Based
For standard pop/rock backbeat ideas, I like to utilize Gary Chaffee’s “fatback” exercises contained within his book Time Functioning Patterns. These pages contain bass drum patterns on each 16th note partial. These can be combined to create many different grooves. I’ll pair those bass drum patterns with various hand ostinatos, such as the following.
Standard Rock

Funky
![]()
R&B

Here are three ways to combine those ostinatos with some bass drum patterns.
![]()
![]()
![]()
Jazz
In a jazz setting, I prefer to use Ted Reed’s Syncopation as a device for reading note lengths and applying them to swing timekeeping independence. (Thank you Alan Dawson and John Ramsey!) Here are the first four measures of page 38 from Syncopation played on the snare and then the bass drum, under a swing ride pattern with the hi-hat on two and four.
![]()

Next, I’ll apply the short notes (8th notes) to the snare and the longer notes to the bass drum.
Latin
I also like to use Ted Reed’s book within a standard bossa nova pattern, playing the rhythm with the left hand as rim clicks.
![]()
Or I’ll interpret the short notes (8th notes) as snare hits and the long notes as buzzes.
![]()
To really challenge my students, I’ll voice the rhythms from Syncopation on the ride cymbal while playing the following pattern.

Fills
Now let’s take a look at how to maintain a steady backbeat within fills. This technique has become very popular in contemporary R&B, pop, and electronic music. I created fill exercises, based on Chaffee’s “‘fatback” section, comprising fragments voiced on the tom and snare. Advertisement
Work through these exercises with your bass drum playing quarter notes and your hi-hat foot closing on beats 2 and 4.

Once you’ve mastered the fill exercises, apply them to four-bar phrases.
Florian Alexandru-Zorn
First of all, it’s really important for me to be aware of two different types of independence. The physical independence is the foundation. Therefore, I use exercises that allow my body to speak. I’m using the word “speak” because, for me, the drums are an extension of my musical thoughts. My goal as a drummer is to speak through my instrument in a musical context.
 The exercise that I use consists of circles and dots. It’s taken from my book, The Drum Master Key. How you read the notation is up to what kind of musical expression you want to work on. There are a total of three ways that correspond with the term of “independence”: dynamic, metric, and sticking.
If you want to work out your dynamic independence, work through the exercises by playing every dot as an accent and every circle as an unaccented note. Or think of every dot representing a double and every circle is an unaccented single stroke. Essentially, you choose the key with which you want to go through that exercise. Advertisement
In terms of metric independence, you can incorporate different note values within one rhythm. Or go through the exercises by playing every dot as a hit and every circle as a pause. Or play line one with the left hand, line two with the right hand, line three with the left foot, and line four with the right foot.
For sticking independence, think of every dot as a right and every circle as a left. (You decide whether to use the hand or foot.
All the exercises will lead to one point, which is musical independence. Once you have the foundation, and your body reacts the way you want it, it’s on you to use the tool to speak through music.
CLICK HERE FOR EXCERCISES.PDF.
TO VIEW PREVIOUS EDUCATION TEAM QUESTIONS CLICK HERE.
