Quarantine Home Recording #2: The Source Sound
By Michael Molenda
Hopefully, our first article in this home-recording series — Don’t Say “Can’t” [READ IT HERE] — convinced you to stop worrying about everything that was preventing you from making tracks all by yourself, and you’ve become a committed member of the “DIY” team.
Now, let’s get your enthusiasm turned into action.
And, because we are advocating the simplest, zero fear-inducing, no big investment, no-worries path to home recording, we are going to outline how you can record cool tracks at home with your laptop, your recording software, an audio interface (to get your signals into the recording software), a playback system (decent headphones or desktop speakers with audio quality above the level of toys), and one microphone.
As we mentioned in the previous column, home-recording musicians don’t need to worry too much about tracking electric guitars, electric basses, keyboards, electronic drums, and anything you can plug directly into your audio interface. Find the appropriate cable, plug in, and go. But, yeah, there are still a couple of “tricks” you can deploy to make direct-recorded sounds come alive, and we’ll go over those techniques in a future column. Advertisement
It’s the acoustic sounds requiring microphones that typically cause home recordists the most agita. What mic do I use? How do I position the mic? What area of my house is optimum for recording the best sounds?
Here’s a tip: Don’t worry about any of that stuff. At this stage, you are documenting your music — not competing with George Martin or Quincy Jones or any of the hotshot hitmakers of the moment. Calm down. Breathe. You are going to totally slay this operation.
Here’s how…
About that Microphone
Really awesome microphones are things of wonder and awe. You probably aren’t going to have one of those — and if you do own a fabulously expensive vintage or high-end mic, then why are you reading this? — so go with what you’ve got, and be happy. Advertisement
You can use the same battered Shure SM57 dynamic mic that you bring along to gigs, or, if you want a little more sonic sparkle, purchase a reasonably priced large-diaphragm condenser mic. Unlike dynamic mics, a condenser will require phantom power from your audio interface, and, happily, most interfaces have 48-volt phantom power onboard.
Many condensers have multiple polar patterns available, so with the flip of a switch, you can capture, say, mostly sound from the front of the mic (cardioid), or sound from the front and back of the mic (figure-8), or sound all around (omni-directional). If your mic has those options, you should have yourself some big fun experimenting with the sounds captured with each polar pattern, because…
No matter what type of mic you have at your disposal — cheap or expensive, dynamic or condenser or ribbon — YOUR EARS are going to be the judge and jury regarding the audio perspective the mic delivers. Advertisement
Yes. Your ears control the game here. And they didn’t cost you even a penny more for recording gear.
The Mic Takeaway: Truly excellent microphones capture transcendent sounds. Most professional recording engineers adore having a whole bunch of amazing mics to audition for specific sounds. However, you — the typical startup home-recording musician — will not have a well-stocked mic cabinet to play with. In this example, you just have your ONE microphone to perhaps do the job of many — especially for tracking drums — but happily you can trust your ears to make that single option work brilliantly for you. Of course, you’ll need a little more instruction on that front, but let’s move on to the recording environment and get back to the mic in a bit.
The Recording Space
Unless you live in Abbey Road Studios London, your home is not going to be a perfectly tuned, isolated, soundproofed, and acoustically diverse vessel for capturing sounds. So it’s back to you and your ears again — do you sense a theme here?
The COVID-19 crisis necessitated that I set up my kit in my home office in order to send drum tracks back and forth to bands that wanted me to record stuff. It’s just a room. But I listened to how things sounded in that room, and I recorded some sonic tests on my laptop and even my cell phone. I discovered that setting the kit too close to the front window was a no-go — even though the view was every nice — because the hard surface made the cymbals sound overly splashy and annoyingly bright. In addition, a slight slapback echo was audible in the hi-hats. Advertisement
Moving the kit towards the comfy office couch wasn’t a bad move, but I didn’t like that the liveness and attack of the drums were muted somewhat by the couch’s soft, padded surface. It was too much of a dry, early Eagles drum sound for my taste.
The best spot to my ears was plopping the drum throne against the front wall near the office door and playing out into the room. Here, I captured some snap and ambience from the front and side windows, as well as a tad of dampening from the couch, so that the room reverb didn’t get too washy or out of control.
If someone did complain about things being a tad too bright, I could move the couch closer to the kit and drop some blankets on the hardwood floor. Likewise, if someone wanted a bit more Bonham, I’d push the couch out into the hallway and let the room’s hard surfaces bounce some more ambient reflections into the recording environment. Reverb, baby!! Advertisement
I should mention here that you may find really ugly stuff such as flutter echoes in an untuned room that’s not designed as a recording space. But if you hear anything you don’t like, seek out where the ugliness is coming from, and terminate it with some blankets or foam. This is not a fix for all acoustic gremlins, but drying things up with soft, unreflective materials can tamp down a lot of sonic villains.
The Recording Space Takeaway: Be creative. Explore. Experiment. Set up drums, acoustic guitars, vocals, and other instruments in different spots to take advantage of their unique characteristics. I’ve captured cool drum sounds in garages with concrete flooring and in kitchens surrounded by tile and stainless-steel appliances. I’ve gotten really shimmering acoustic-guitar tones by sitting on the edge of a bathtub and pointing the mic at the tiled wall. Like the cliche, vocals can sound great recorded in bathrooms. Want a drier vocal tone? Try singing into a clothes closet with the mic positioned in front of your hanging coats, hoodies, and shirts. Use those ears, find those fabulous “hot spots” in your house, and put them to use.
The Caveat: You live in your house. It’s not a recording studio. So commandeering the kitchen, office, bedroom, bathroom, garage, or tool shed often requires permission (and understanding) from your house mate(s), as well as temporary moving of certain objects to facilitate recording instruments. As both my wife and I (and the dogs) are currently sheltering-in-place, I have to schedule the noise making when she is on an errand outside of the house, or taking lunch in the backyard, or otherwise out of earshot for a while. It’s not a perfect situation from a creative standpoint, as I want to record whenever I feel most energized, but we’ve made the scheduling work, I’ve gotten a ton of tracks recorded during the pandemic, and no heads have exploded. You can do the same. Advertisement
Positioning A Single Mic in the Recording Environment
And we’re back to your microphone, as promised.
Mic positioning is an art — especially when you are limited to just one — but if you freak yourself out obsessing over whether you have what it takes to always find the ultimate sweet spot for recording every sound, you’ll just frighten yourself into a dead zone of inactivity.
No one is expecting you to be a master engineer. (Please repeat this mantra over and over if you begin driving yourself nutso: “I do not have to be the best engineer ever. I simply need to capture one sound at a time.”) Trust your ears. You know what you like to hear when you listen to recordings by your favorite artists, and you’ll know what is a good sound when you listen to your own, homegrown recordings.
So…
You’ve found the room in your house where you dig the sound of your drums. You’ve also recorded a couple of quick tests on your laptop or cell phone to confirm the acoustic environment is rocking. Now, let’s refine the placement of that one microphone. Advertisement
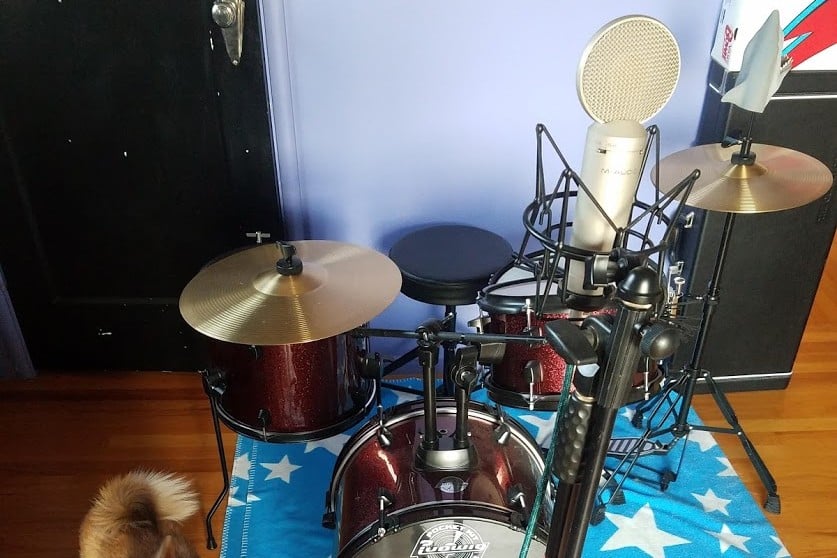
In the photo at the top of this article, you can see that I started with a very basic mic position approximately three feet from the front of the kick drum at a height of about five feet. (Note: At present, my Yamaha gig kit is tucked away at a COVID-closed San Francisco rehearsal facility, so I acquired a “home-office-friendly” Ludwig Pocket Kit to record at home.) This perspective produces a nice smack and pop on the snare, a boomy kick with enough attack to cut through a mix, and some good cymbal brightness. But if I need a less-boomy kick, and the hi-hats a little more mixed into the overall sound of the kit, I will move the mic around until I hear something pretty darn close to what I’m looking for.
Tip: It’s important to let your ears do the work here, and NOT your eyes. For example, the coolest drum sound for your track might be achieved with the mic lowered right to the middle of the kick drum at a distance of a foot. Your eyes might tell your brain, “Yeah. Good luck getting a nice snap from the snare and some nice air and dimension from the hi-hat and cymbals with THAT crazy position.”
Your eyes might also seduce you into thinking the most balanced drum sound would come from raising the mic high above the kit and pointing at the snare or rack toms. Maybe you’ve seen that setup in a recording magazine or tutorial. Copying that exact position might even do exactly what you expect. Or it could be absolutely inappropriate for the track you are working on — perhaps the cymbals are too far front and everything else sounds kind of overly bright and thin. Advertisement
Here’s the thing about “visual mic positioning.” Whomever wrote about (or diagrammed) a specific mic position did not set it up in your room at your house with your mic. An expert engineer can assume certain things about sound production — that’s why they are pros — but without working in your exact environment with your exact recording tools and dealing with the specific track you’re working on, he or she can’t predict the sonic outcome with any degree of precision.
So the wonderful situation here is no matter how little recording knowledge you may have, your own ears need to determine how a source sound is being captured by your single mic, and whether that sound is the right sound for your track.
The infamous ’60s recording engineer and producer Joe Meek used to say, “If it sounds right, it is right.” Put everything else out of your mind.
Mic Positioning Takeaway: Whether you’re recording a drum kit, an acoustic guitar, or a vocal, the best mic placement is the one that delivers the sound you want. And remember — using one microphone to record a drum kit (or other source sound) is NOT a recipe for disappointment, failure, and/or regret. Previous to the advancement of studio technology and multitrack recording in the mid-1960s, entire songs were recorded using just one microphone. Once again, trust your ears, pay attention to your creative muse, and you’ll do a fantastic job. Advertisement
Next Column: Five Ways to Tank Your Drum Mix
